
Google NotebookLM helps you work with information from documents, websites, videos, and other supported sources. Instead of starting with a general question, you create a notebook, add the material you want to study, and ask questions about that material.
You can use it to summarize a research paper, compare information across documents, prepare study notes, or turn reading material into an audio overview.
But there is an important distinction: NotebookLM can help you understand your sources, but its answers still need to be checked against the original material.
In this guide, you’ll learn how to use NotebookLM step by step, including how to add sources, ask useful questions, check citations, create study materials, and avoid common mistakes.
Table of Contents
What Is Google NotebookLM?
NotebookLM is Google’s AI-powered research and learning tool.
Its central idea is straightforward: you provide sources, and NotebookLM helps you explore the information inside them.
For example, imagine you’re studying a technical subject. You have a PDF manual, a set of lecture notes, and an article explaining a difficult concept. You can put those materials into one notebook and ask NotebookLM to identify the main ideas, explain terminology, or compare what different sources say.
A notebook is a collection of sources for a particular project or topic. Google explains that notebooks are independent, so information in one notebook is not automatically available in another.
Unlike a conventional note-taking app, NotebookLM can generate answers and study materials based on the content you provide. However, it should not replace careful reading when accuracy matters.
How to Use NotebookLM: Step-by-Step
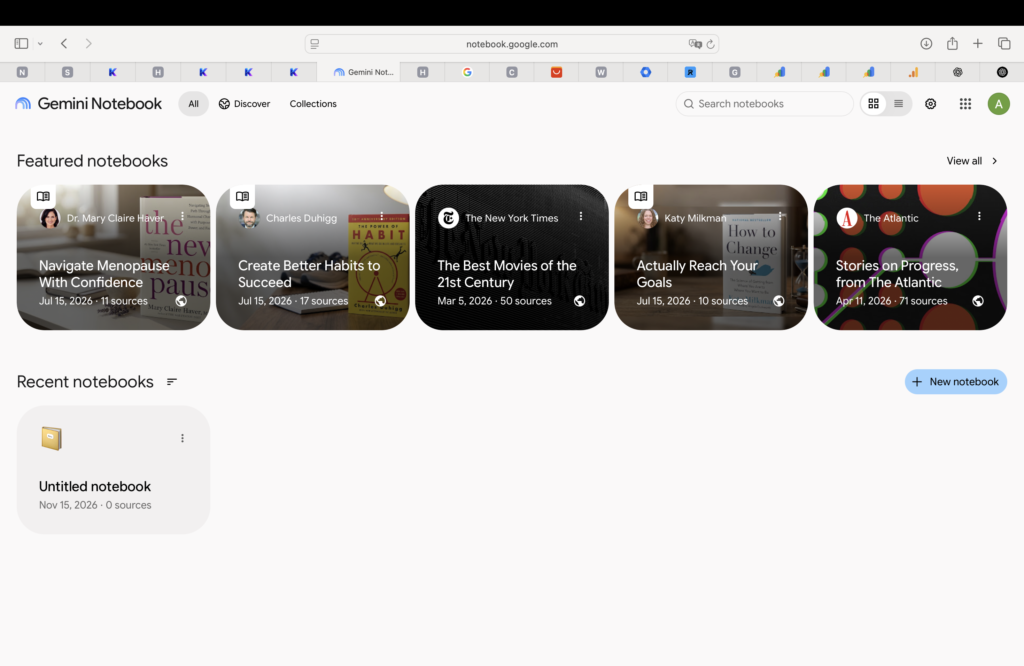
Step 1: Open NotebookLM and Create a Notebook
Go to notebooklm.google.com and sign in with your Google account.
From the main interface:
- Select the option to create a new notebook.
- Give the notebook a descriptive name.
- Add your first source when prompted.
For a study project, you might name the notebook Aircraft Aerodynamics — Study Notes. For a work project, a name such as Quarterly Research — Source Documents can make it easier to recognize later.
Try to keep each notebook focused on one subject or project. Mixing unrelated materials can make it harder to identify which sources are relevant to a particular question.
Step 2: Add Documents and Other Sources
After creating a notebook, add the information you want NotebookLM to work with.
Depending on the current product interface and supported source options, you can add materials such as:
- PDF documents
- Google Docs and Slides
- Word documents
- Text and Markdown files
- Webpage URLs
- Public YouTube video URLs
- Supported audio and image files
Google also documents support for additional source types, including spreadsheets and CSV files. Availability and limitations can vary by feature or account.
To add material, open the notebook’s Sources area, select Add sources, and choose the file or source type you need.
For your first notebook, start with one or two short documents that you already understand. This makes it easier to judge whether the generated answers are accurate.
Practical example: Upload a course handout and a short reference document covering the same subject. Later, ask NotebookLM to explain their shared concepts and identify differences.
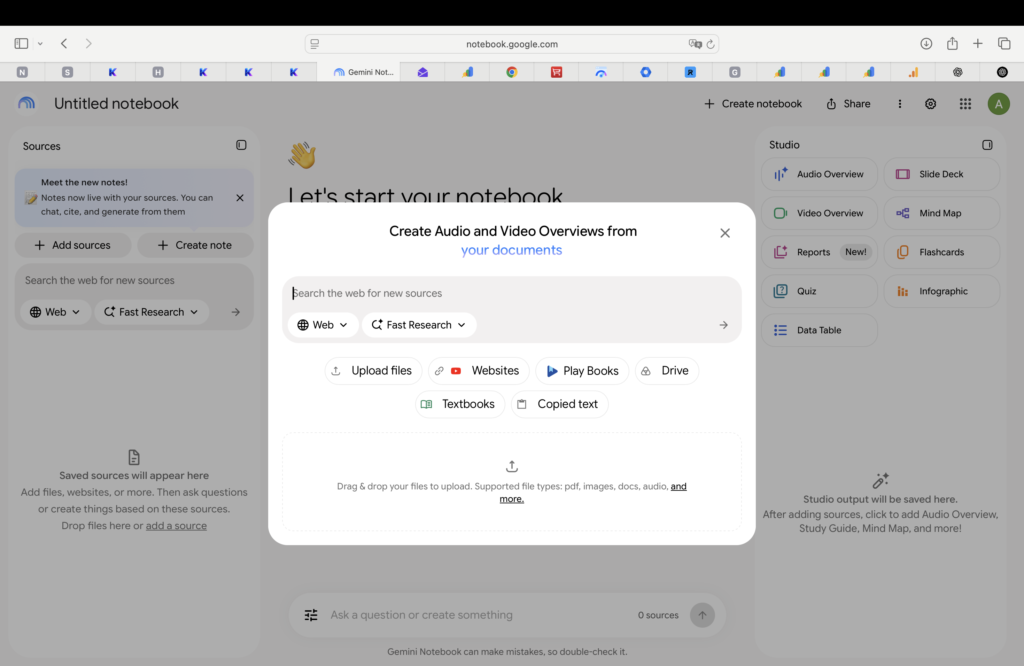
For the latest file formats and limitations, consult Google’s official source guide.
Step 3: Ask Questions About Your Sources
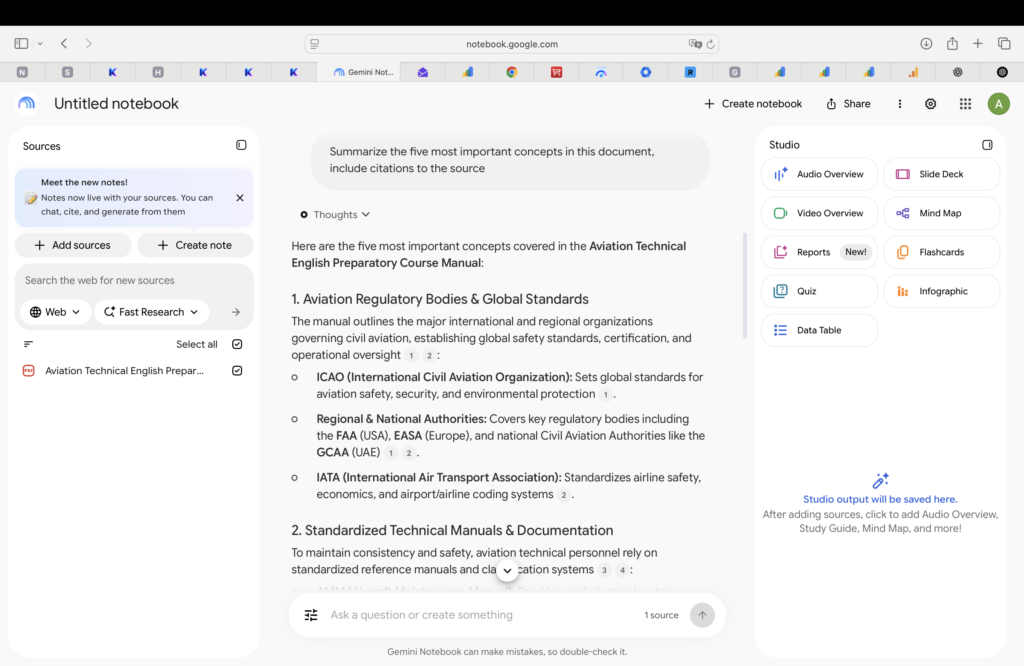
Once your sources are available, use the chat area to ask questions.
Start with a focused request instead of a vague instruction such as “Explain everything.”
For example:
Prompt 1 — Understand the main ideas
Explain the five most important concepts in these sources. Use simple language, preserve important technical terms, and cite the relevant source passages.
Prompt 2 — Compare two documents
Compare the information in these two documents. Identify where they agree, where they differ, and which points are not clearly addressed.
Prompt 3 — Find specific information
What does the uploaded material say about [topic]? Identify the relevant sections and explain the answer without adding unsupported details.
These prompts are templates, not guaranteed commands. The usefulness of the answer depends on the quality and relevance of the sources.
Step 4: Check the Citations
One of NotebookLM’s most useful features is its ability to link answers to supporting source material.
When a response includes citations, open them and read the referenced passages.
Check whether:
- The cited passage actually supports the claim.
- Important conditions or exceptions were omitted.
- Numbers, dates, and technical terms match the original.
- The response combines information from different sources accurately.
A citation is a useful verification tool, not a guarantee that the interpretation is correct.
If the source does not clearly answer your question, ask NotebookLM to distinguish confirmed information from uncertainty.
Try this prompt:
Review your previous answer against the uploaded sources. Identify any statement that is not directly supported and explain what information is missing.
This step is especially important for technical, academic, financial, or other consequential information.
Step 5: Create Study Notes From Your Sources
NotebookLM can help turn dense reading material into more manageable study notes.
You can ask it to organize information by topic, define key terms, and identify relationships between ideas.
For example:
Create study notes from these sources. Organize them by topic, explain key definitions, highlight important relationships, and finish with ten review questions. Use only the supplied material.
For a complicated subject, consider working one section at a time rather than requesting a complete set of notes from a large collection of sources.
Google also offers learning-oriented outputs, including flashcards and quizzes, through supported NotebookLM features.
If those options are available in your notebook, use them to test your understanding rather than simply rereading summaries.
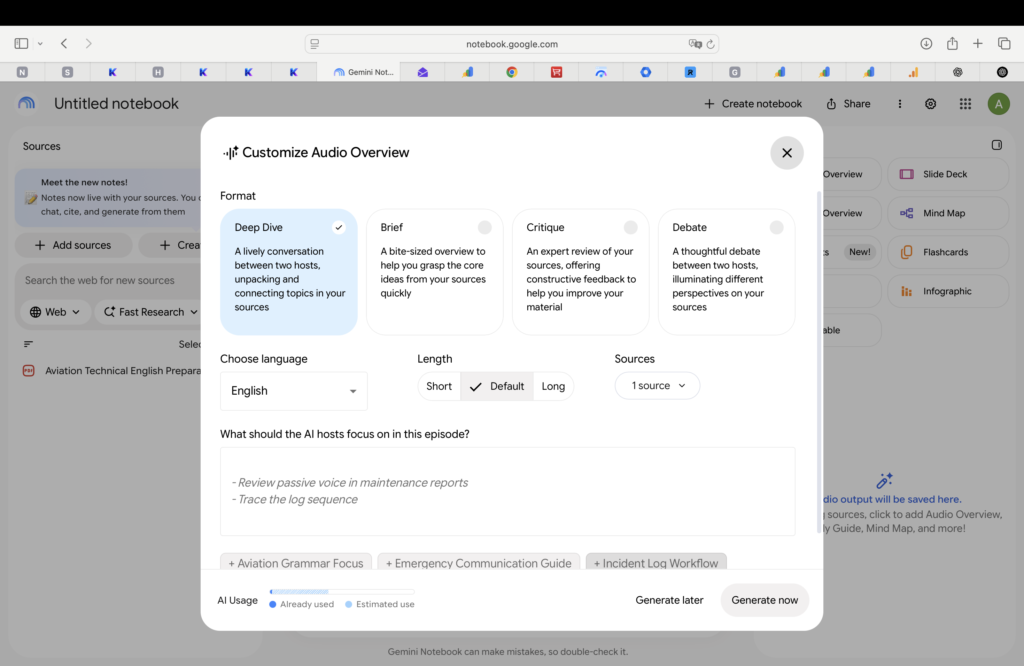
Step 6: Generate an Audio Overview
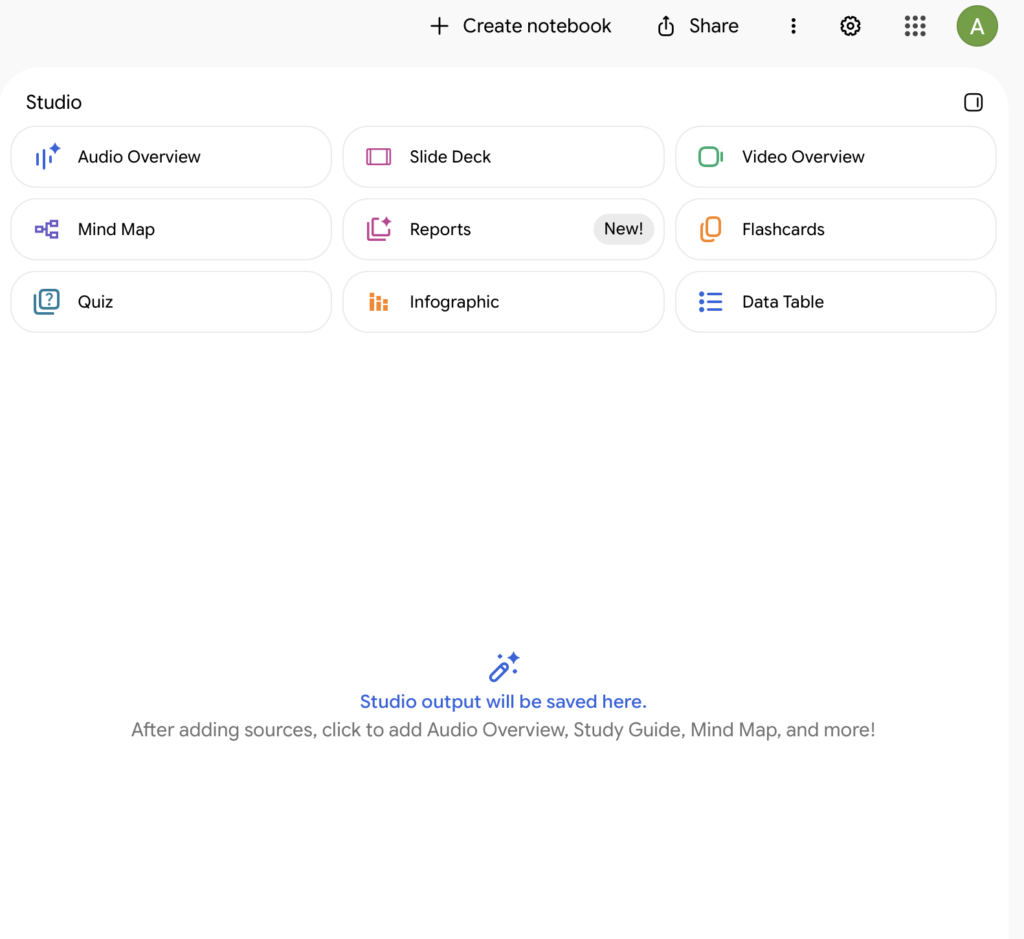
An Audio Overview transforms information from your sources into an AI-generated spoken discussion or summary.
To create one:
- Open a notebook containing your sources.
- Find the Studio panel.
- Select Audio Overview.
- Choose the available format and customization options.
- Generate the audio and listen to the result.
Google documents several Audio Overview formats, including a detailed discussion and a shorter briefing. The options available to you may depend on the current interface.
Audio Overviews can be useful when you want to revisit material while walking, commuting, or doing another activity that does not require your full visual attention.
However, Google warns that AI-generated audio can contain inaccuracies or audio glitches.
Use the audio to reinforce your understanding, not as your only source of information.
Learn more in Google’s Audio Overview documentation.
Best NotebookLM Prompts for Beginners
Good prompts specify what you want, how the answer should be structured, and which information matters most.
Here are five useful starting points.
1. Summarize a Document
Summarize this document in 200 words or fewer. Identify its main purpose, central ideas, and important conclusions. Preserve critical figures and terminology, and cite the source.
2. Explain a Difficult Concept
Explain [concept] to a beginner using only the uploaded sources. Define technical terms and provide a simple example if the sources support one.
3. Prepare for an Exam
Turn these sources into a revision guide with key definitions, essential concepts, common misunderstandings, and ten practice questions with answers.
4. Compare Multiple Sources
Compare the main arguments in the selected sources. Present their similarities, differences, supporting evidence, and any unresolved questions.
5. Identify Missing Information
Based on these sources, what questions remain unanswered about [topic]? Separate information that is explicitly supported from information that would require additional research.
You do not need complicated prompt formulas. Clear instructions and relevant source material are more valuable than unnecessarily long prompts.
How to Use NotebookLM for Studying
NotebookLM can be particularly useful when a course requires reading several documents on the same subject.
A practical workflow is to create a notebook for one course or unit, add the assigned reading, and work through the material in stages.
First, ask for a short overview so you can identify the major topics. Next, explore each topic with specific questions. Then create study notes or review questions.
Finally, return to the original sources and check the details you need to remember.
Example workflow for a technical subject:
- Add a course handout and its supporting reference material.
- Ask for a list of the major systems or concepts discussed.
- Choose one concept and request a beginner-friendly explanation.
- Ask for five questions that test understanding rather than memorization.
- Check each answer against the relevant source passages.
The goal is not to let AI do all the thinking. It is to make the source material easier to navigate so you can study it more effectively.
How to Use NotebookLM for Research and Work
NotebookLM is also useful when you need to compare information across several documents.
For example, you might have a project brief, meeting notes, and a research report.
You can add them to a notebook and ask:
Identify the project objectives, decisions already documented, outstanding questions, and any differences between these sources. Cite the relevant material for each finding.
This can help you organize information before preparing your own report.
Still, review the source documents before relying on generated conclusions. A summary can miss context, and a confident answer may not fully reflect the underlying evidence.
For sensitive documents, check your organization’s data-handling rules and the product’s applicable privacy terms before uploading anything.
Common NotebookLM Mistakes to Avoid
Adding Unrelated Sources to One Notebook
A notebook works best when its sources have a clear purpose.
If you’re researching several unrelated topics, separate notebooks can make the material easier to manage.
Asking Questions That Are Too Broad
A request such as “Tell me everything” may produce an overview that is too general.
Instead, identify a topic, section, comparison, or output format.
Assuming Every Answer Is Correct
NotebookLM can produce mistakes or incomplete interpretations.
Open citations and verify important information against the original material.
Uploading Poor-Quality or Unreliable Sources
An AI tool cannot turn inaccurate source material into reliable evidence simply by summarizing it.
Check the author, publication date, and credibility of your sources before relying on the results.
Treating Generated Study Notes as a Replacement for Reading
Summaries and flashcards can support learning, but they may omit examples, exceptions, or context.
Use them alongside the original material.
NotebookLM vs ChatGPT: What’s the Difference?
NotebookLM and ChatGPT can both help you work with documents, but their workflows are different.
NotebookLM is organized around notebooks containing selected sources. Its research workflow emphasizes asking questions about those sources and checking supporting citations.
ChatGPT is a broader AI assistant that can also analyze uploaded files, answer questions, help with writing, and support other tasks.
Neither approach is automatically better for every situation.
If your main goal is to study a collection of documents and trace answers back to source passages, NotebookLM is worth considering.
If you need broader assistance beyond a source collection, ChatGPT may be more suitable for that workflow.
For a detailed comparison, see our upcoming guide, NotebookLM vs ChatGPT.
You can also read our existing guide: How to Summarize a PDF With ChatGPT.
Frequently Asked Questions
Is NotebookLM Free to Use?
Google offers a free level of access, with usage limits. Higher limits and additional capabilities may be available through eligible paid plans. Check Google’s current plan information before relying on a specific limit.
Can NotebookLM Summarize PDF Files?
Yes. PDF is one of Google’s documented supported source types. You can add a PDF to a notebook and ask for summaries or answers about its content. Results depend on the document and how its contents are processed.
Can NotebookLM Read Websites?
NotebookLM supports webpage URLs as sources. However, imported content and accessibility can vary, so confirm that the relevant information was successfully added.
Can NotebookLM Analyze YouTube Videos?
Google supports eligible public YouTube URLs as sources. The information available for analysis depends on the source content that the product can import.
Does NotebookLM Provide Sources for Its Answers?
NotebookLM can display citations linking generated answers to supporting passages in uploaded material. Always inspect those citations when accuracy matters.
Can I Use NotebookLM on My Phone?
Google provides mobile access, although some features or workflows may differ from the desktop experience. For this guide, the desktop interface is the recommended starting point.
Is NotebookLM Better Than ChatGPT for Studying?
It depends on the task. NotebookLM’s source-centered workflow can be useful for studying assigned material, while ChatGPT supports a wider range of conversational and document-related tasks. Evaluate them based on the sources, features, and outputs you actually need.
Final Thoughts
Learning how to use NotebookLM starts with a simple workflow: create a notebook, add trustworthy sources, ask focused questions, and verify the answers.
From there, you can experiment with study notes, comparisons, quizzes, and Audio Overviews.
The biggest improvement comes not from using more features, but from asking better questions and checking the evidence behind the responses.
Start with a small collection of documents you know well. Once you’re comfortable with the results, use the same approach for larger study or research projects.